Master Buss Compression is probably one of the most underrated yet overrated process in music production, it’s one of those things that everyone feels forced to do while mastering a track, but it’s also one of those things that can completely mess things up if you don’t know exactly what you are looking for, and this often results in either over compressing or not compressing the track at all.
It is important to understand how beneficial even just a couple of db of gain reduction can be for the entire mix, I feel like in a way, dance music has “hard wired” producers into thinking that everything has to be compressed “to death” to sound bigger, and while this might work on single sounds, when it comes to buss compression, less really is more.
WHAT’S THE BEST COMPRESSOR
There are a ton of compressors at our disposal nowadays some are better than others when it comes to mastering, this concerns both brands and circuit type. I’m not going to focus on brands in this article, since I think this is not as relevant as the circuit of the compressor. The most known circuits are VCA, Optical (or Opto), FET and Vari-Gain.
In my personal experience (as well as taste) VCA compressors are the best suited for electronic music, their power to glue elements together as well as adding punch make them the perfect tool for mastering electronic music.
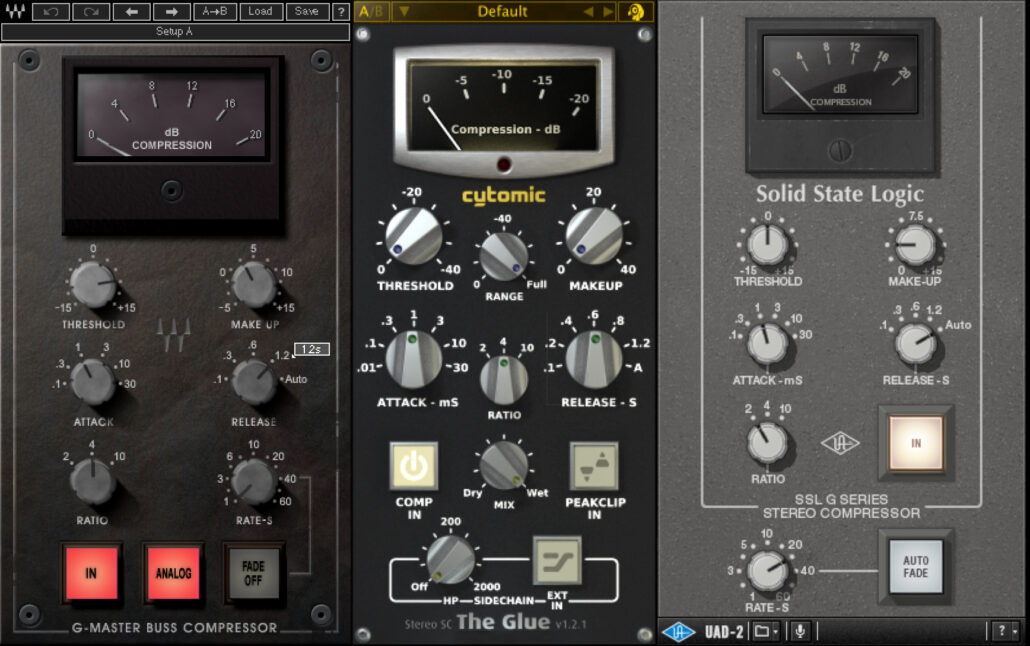
Among the most popular VCA compressors we find the SSL buss compressor which we can find in the digital world with plugins emulations like: the glue, waves SSL compressor, Ableton Glue Compressor, UAD SSL Compressor etc.
This compressor has created the sound of countless records and is by far the most famous master buss compressor of all.
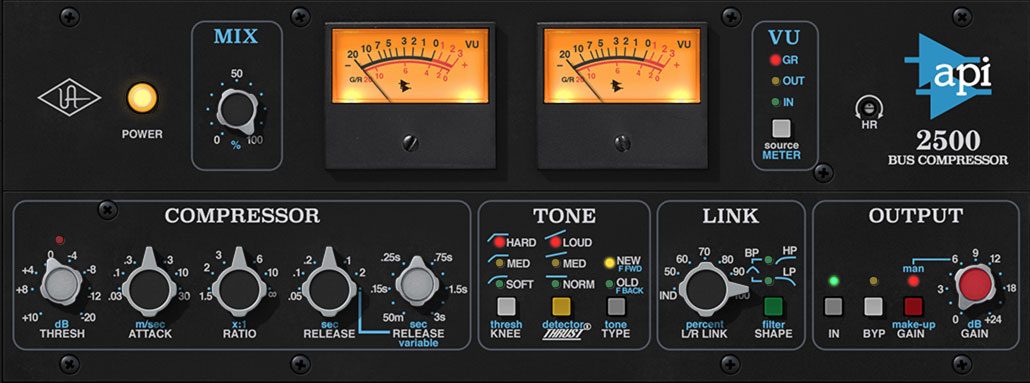
Another great VCA compressor (that I actually tend to like more than the SSL for mastering) is the API 2500 which we can also find as a plugin by UAD and waves, this unit has a bit more control and options compared to the SSL and it also has a bit more “bite” which is the reason I often choose it over the SSL, especially if I want to add more punch to the overall mix.
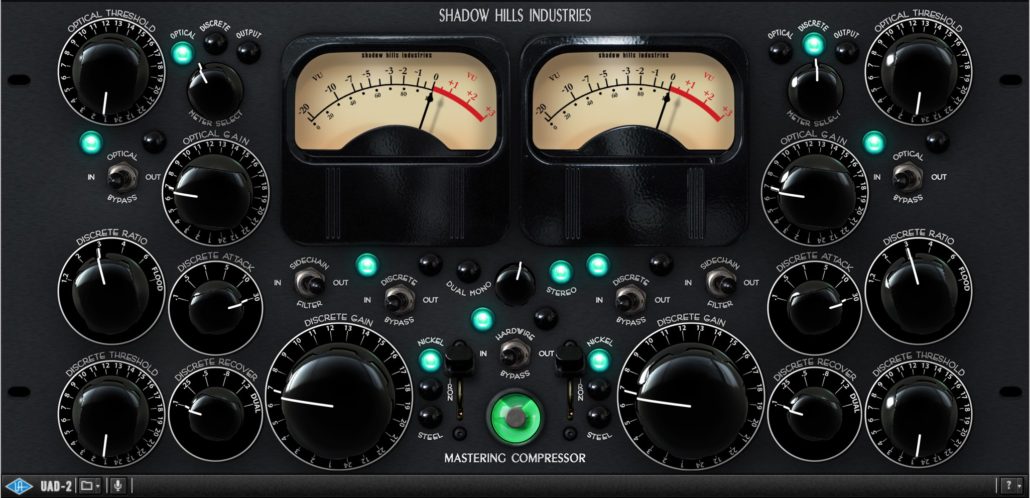
The last example of VCA master buss compressor is the shadow hills, a monster of a hardware that we can find as a plugin in the UAD version.
This compressor is slightly different from the previously mentioned as in reality it’s 2 compressors in 1, the first module is an Opto compressor that is used to transparently control the excessive peaks in the track and then we have a discrete compressor (VCA) that we can use to shape the transients, both module can be bypassed and more than once I found myself using only the discrete module as the Opto can be too slow to keep up with the beat of the music and this result in a completely messed up flow of the groove, which results in a bad compression.
SETTINGS
The most important factor when compressing a whole mix is the music, especially the beat, forget every “golden rule” you read on the Internet and resist the temptation of using that “Master Buss 2” preset and just keep this few simple things in mind:
ATTACK
The faster the attack the faster the compressor is gonna react to the loudest peak (meaning your kick, and if it’s not your kick, something is wrong with your mix) this means that the compressor is literally gonna trim transients away from your track and this is something you don’t want in mastering, what you want is adding punch to the mix, so a slow attack is the key, 3ms but more often 10-30ms are my go to.

RELEASE
Setting the release is actually really simple, the trick is to get the compressor to once again, go with the music, if your release is too slow, the compressor won’t have the time to recover completely, so by the time the next kick comes in, the compressor is gonna start working again without going back to zero, this means that the track will not be able to breathe as it’s going to be constantly compressed, and even in this case the transients will be compromised and so will be the groove and the whole flow.
The optimal release setting is something quite fast, play a section of the track that only has kick and percussions, adjust the threshold (explained next) till you see the needle of the compressor working, once this is set, play with the release knob and make sure the needle is back to zero before the next kick comes in.
Sometimes hi-hats and toms trigger the compressor as well, it’s ok, a very fast release usually still gives the compression enough time to fully recover or at least get very close to full recover.
My personal release settings are usually between .1 and .4, being a control freak I’ve always been a little scared about the “auto” release on the SSL and API , however I must admit it worked well on a couple of occasions.

THRESHOLD & RATIO
Setting the release is actually really simple, the trick is to get the compressor to once again, go with the music, if your release is too slow, the compressor won’t have the time to recover completely, so by the time the next kick comes in, the compressor is gonna start working again without going back to zero, this means that the track will not be able to breathe as it’s going to be constantly compressed, and even in this case the transients will be compromised and so will be the groove and the whole flow.
The optimal release setting is something quite fast, play a section of the track that only has kick and percussions, adjust the threshold (explained next) till you see the needle of the compressor working, once this is set, play with the release knob and make sure the needle is back to zero before the next kick comes in.
Sometimes hi-hats and toms trigger the compressor as well, it’s ok, a very fast release usually still gives the compression enough time to fully recover or at least get very close to full recover.
My personal release settings are usually between .1 and .4, being a control freak I’ve always been a little scared about the “auto” release on the SSL and API , however I must admit it worked well on a couple of occasions.
LEARNING TECHNIQUES
Everything I went thru in this post so far has the sole purpose of helping you NOT over compress, however, a good way to learn and especially hear what’s going on, is doing the exact opposite.
If you really want to understand what’s going on, how is your compressor reacting and how changing the ratio, the attack or the release really affect your track, try applying a heavy compression, something that is obviously wrong and sounds bad but that is so obvious that allows you to really grasp what is going on, try it once, try it 10 times, or even a hundred times, try to really understand what reacts to what and how, once you understand everything that’s going on, just compress those couple of dbs, the difference between a good compressed track and the same track without the compressor can be extremely subtle and it’s hard to hear it at first, this is why learning on something overcompressed can be helpful.
POSSIBLE SCENARIOS
As I mentioned earlier in the post a good way to approach mastering compression, for as hard as it can be, is forget about the rules, the presets, and focus mostly on the music, I then went ahead and gave you “rules” myself, but once again, think of my suggestions as really basic starting points.
Each track is different, each compressor model / brand is different so there is never going to be a universal setting that will just work, knowing what you are doing and what a certain setting does however will definitely get 50% or more of the job done.
Here are some of the settings you can have in a compressor during mastering along with their pros and cons.
SLOW ATTACK, FAST RELEASE
Pro : Good for impact, and stronger transients, everything tends to be more in your face
Con : The track can become too aggressive and “harsh”, you might introduce a “pumping” effect similar to sidechain if you take the compression too far.
FAST ATTACK, FAST RELEASE
Pro : Good for smoothing things out if the transients are too snappy.
Con : Can take the life out of a mix if taken too far
FAST ATTACK, SLOW RELEASE
Pro : Good for controlling a track and keep everything in place
Con : Can take the life out of a mix if taken too far
SLOW ATTACK, SLOW RELEASE
Pro: Good to control the loudest transients of a track
Con: Can completely destroy the flow and groove of the track and lead to over compression